This box is a simple project, but a few things help it stand out: it’s simple to build, its contrasting woods make it visually interesting, and adding a layer of veneer is easy and beautiful.
Cut list:
– Ends ⅝” x 5-1⁄<sub2” x 4-⅞”
– Front and back ⅝” x 5-½” x 8-¾”
– Bottom ¼” x 4-13⁄16” x 8-1⁄16”
– Lid ⅝” x 5-¾” x 9”
Joinery
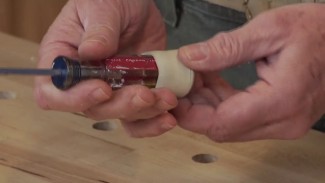
All the joinery can be done on the router table. Cut a 5/16” deep by ⅝” wide rabbet on the front and back using a ¾” bit. Be sure to use a backer board to prevent chipping. Use a ¼” bit to cut the groove for the bottom, which is also 5⁄16” deep, ¼” from the bottom edge. Do this to all four pieces, keeping the rabbeted faces of the front and back down on the router table. The rabbet in the lid is ¼” x ¾”. Be sure to test the fit to make certain the lid fits on the box. Cut a ¼” x ¼” chamfer on the top of the lid using a chamfer bit.
Assemble
Sand the inside faces and assemble the box. Double-check the dimensions of the bottom before installing it and gluing the box together. Standard yellow glue works fine for this.
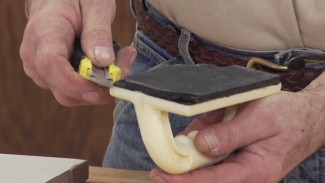
Veneer the lid
If you get a mixed pack of veneers, you’ll have lots of species to choose from. Leave the lid and veneer oversize and cut them to size after the veneer is on. Be sure to use wax paper between the veneer and caul when you glue them up.
More veneering
If you enjoyed this project, check out our veneered-face clock.
More info
For more information on Titebond products, call (800) 669-4583 or visit the company’s website.


This a great project for a beginner like me. I don’t have a router, so how would I build this? What joint would work here? Thanks
Hello Allen,
Rabbet joinery could also be milled in a table saw. Another simple option would be to use butt joinery. On a small decorative box like this a butt joint should be plenty strong. If you use a butt joint, use a glue that provides extended open time, such as Elmer’s Glue-All, or Titebond 3. Apply glue on both surfaces, wait a couple minutes, then reapply to the end grain. This will compensate for any glue that is absorbed by the end grain.
Paul
Woodworkers Guild of America
Even though you say to use a back for a push block to prevent tear out on the router table, after you make the first cut there is no back board there any more to prevent it or is it the sides that still support there is what is helping.
Thanks, Alan
Hello Alan,
Good question. The backer board still supports the cut after the initial pass has been made. It is holding the wood fibers in tact in the space adjacent to where the cut is made.
If you have any other questions, please chat, email, or call Customer Service.
Sincerely,
Sarah
Wood Workers Guild of America Video Membership
But how do you cut it to size with the oversized veneer? That was the part I was most interested in. The ends had overhanging veneer that couldn’t safely butt up against a table saw fence…
Hello Liz,
Thank you for contacting us.
George applied the veneer such that it was overhanging on only two sides, giving you two clean edges as a starting point.
If you have a piece where the veneer is overhanging on all four sides, you could clamp a board to your table saw fence temporarily, allowing enough space underneath it for the veneer to safely pass without contacting the fence, while the work piece rides long the temporary fence that you have created.
If you have any other questions, please chat, email, or call Customer Service.
Sincerely,
Sarah
Wood Workers Guild of America Video Membership
Whenever you add veneer to a surface ( Especially a piece of solid wood) you have to add a piece of veneer to the opposite side to “Balance” , the panel. Not doing this will make the panel warp and twist out of shape.
Were the bottom grooves unglued for expansion? Not needed because the box is small? Wood they be glued or nailed if the box were bigger and holding weight like a tool box?
Hello Bill,
Thank you for contacting us.
They were not glued to allow for expansion and contraction. For a larger box, you still would not glue or nail a solid wood bottom. If you wanted to permanently affix the bottom, you would want to use a manufactured product such as plywood or MDF.
If you have any other questions, please chat, email, or call Customer Service.
Sincerely,
Sarah
Wood Workers Guild of America Video Membership
This is a great use of veneer, I have found a simple way, thinly apply glue to both the lid and the veneer, let it dry and activate both glued surfaces with an ordinary household iron.