Learning the basics of cabinetmaking will take you a long way. Use these skills to build vanities, bookcases, dressers and, of course, cabinets for your shop or kitchen. This three-part video series will provide you with the cabinetmaking tutorial you need to get started. Be sure to download the plan for detailed information on the project and sources for the items used.
Getting started
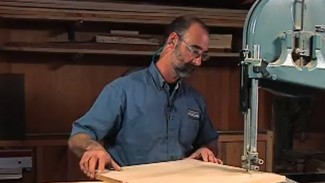
Cabinet carcases, boxes, are typically made from plywood. The first step in most cabinetmaking projects is cutting the plywood down to more manageable sizes to make it easier to handle. This can be done with a circular saw and straight edge.
Refine the parts
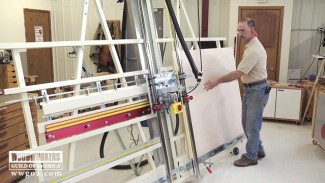
After rough cutting the parts to more manageable sizes you’re ready to cut them to their final sizes. See the cut list on the plan for all the part sizes. Kreg’s Adaptive Cutting System works great for this, providing a platform for the material to rest on and a track and saw for accurate cutting.
Joinery
Cabinet carcases are commonly assembled and held together with dadoes and rabbets. A general rule of thumb for depth of these joints is 1/2 the thickness of the material. In this case, ⅜”. These joints, along with the rabbet that receives the back, can be cut on the router table. Remember to add adjustable shelf holes before assembling the case.
Assembly
Before gluing the carcase up, spend some time sanding the interior faces. It’s much easier to sand these surfaces while the parts are still separate. Standard yellow glue works fine for projects like this. After clamping the case measure the diagonals to check it for square, adjust as needed, and allow the glue to dry.


What plywood and face frame wood did George use for this project?
Hello Ross,
Thank you for contacting us.
Maple veneer core plywood and solid maple face frame.
If you have any other questions, please chat, email, or call Customer Service.
Sincerely,
Sarah
Wood Workers Guild of America Video Membership
Thank you. Does the maple plywood tend to splinter less when crosscut then oak ply?
Hello Rossolini,
I would say that it is slightly less prone to chipping. That said, it’s still critical to use a good blade that is designed for cutting veneers.
Paul
Woodworkers Guild of America
I have followed George’s tips and how to’s and wonder if the plywood thickness of 1/4′ is ‘nominal’ size or actual size. I machined the back rabbets and door tongue and groove based on the plywood being 1/4″ (0.25″). However, I am having difficulty finding 1/4″ plywood. The 1/4″ plywood at Home Depot and Lowes is approximately 0.234″ which makes it a very loose fit. Any ideas on sources of good plywood?
Highly disappointed that there is no fast forward function.
I meant to say that there was no speed up function was highly disappointing. I need to be able to watch the videos at my pace of life…
Chrome extension “Speed Control”
I see that Kreg promoted this video by providing all the tooling for this job. I have seen a similar class by George where he used a Saw Stop table saw to square the sheet goods and cut the plywood. I want to build kitchen cabinets and then a hobby center for my wife. I need a table saw, or equivalent and a router table. Does George prefer the Saw Stop/router table approach ($2.5K) or is the all Kreg solution a better approach for beginners to intermediate users? The Kreg solution certainly seems less expensive.
Hello Donn,
Thank you for your question.
There are a lot of “it depends” involved in the answer.
A table saw provides great ease of use and repeatability via the fence. It can be used to cut dadoes. But, as you pointed out, a table saw can be expensive AND it will take up a lot of space in a shop.
The Kreg system is incredibly versatile, costs less money and can easily be folded up and put against a wall when you’re not using it. It’s also very portable and can be used on site as needed. But using it for cabinetmaking isn’t as straight forward as using a table saw.
So, like a lot of tools, you have to tailor your buying decision to the needs you have today, and long term.
If you have any other questions, please chat, email, or call Customer Service.
Sincerely,
Sarah
Wood Workers Guild of America Video Membership
I beg to differ
Where is the formula for making the door frames? I downloaded the plans but don’t see it?
Sorry I overlooked it on page 2
I am watching build a wall cabinet part one”. Where do I find the parts list and cutting guide for that project.
Hello James,
Thank you for contacting us.
If you look in the Description below assembly, you will see a link “Build a Wall Cabinet with Kreg Plan Download”. Click on the link to downlad the parts list and cutting guide
Please let us know if you have any further questions
Sincerely,
Sarah
Wood Workers Guild of America
I like to have my back cut to ensure the box stays square and use a couple corner clamp blocks . It seems I have parts move as soon as I walk away .